How to convert videos between different formats with Easy Video Maker?
And how to render multiple projects?
How to convert videos between different formats with Easy Video Maker? And how to render multiple projects?
Today, we wanna share you a practical operation.
It is a useful tool to save your time when you need to convert lots of videos between different formats, or render a bulk of project files one time.
I’ll show you how to use it.
Step 1: Run the Easy Video Maker and click the “Function Modules ” in the upper left corner of the top line. And choose the “Render Multiple Projects or Videos”.
Then, you’ll see a UI screen as below. Next, click the “big and red plus ” button to add all source videos or project files.
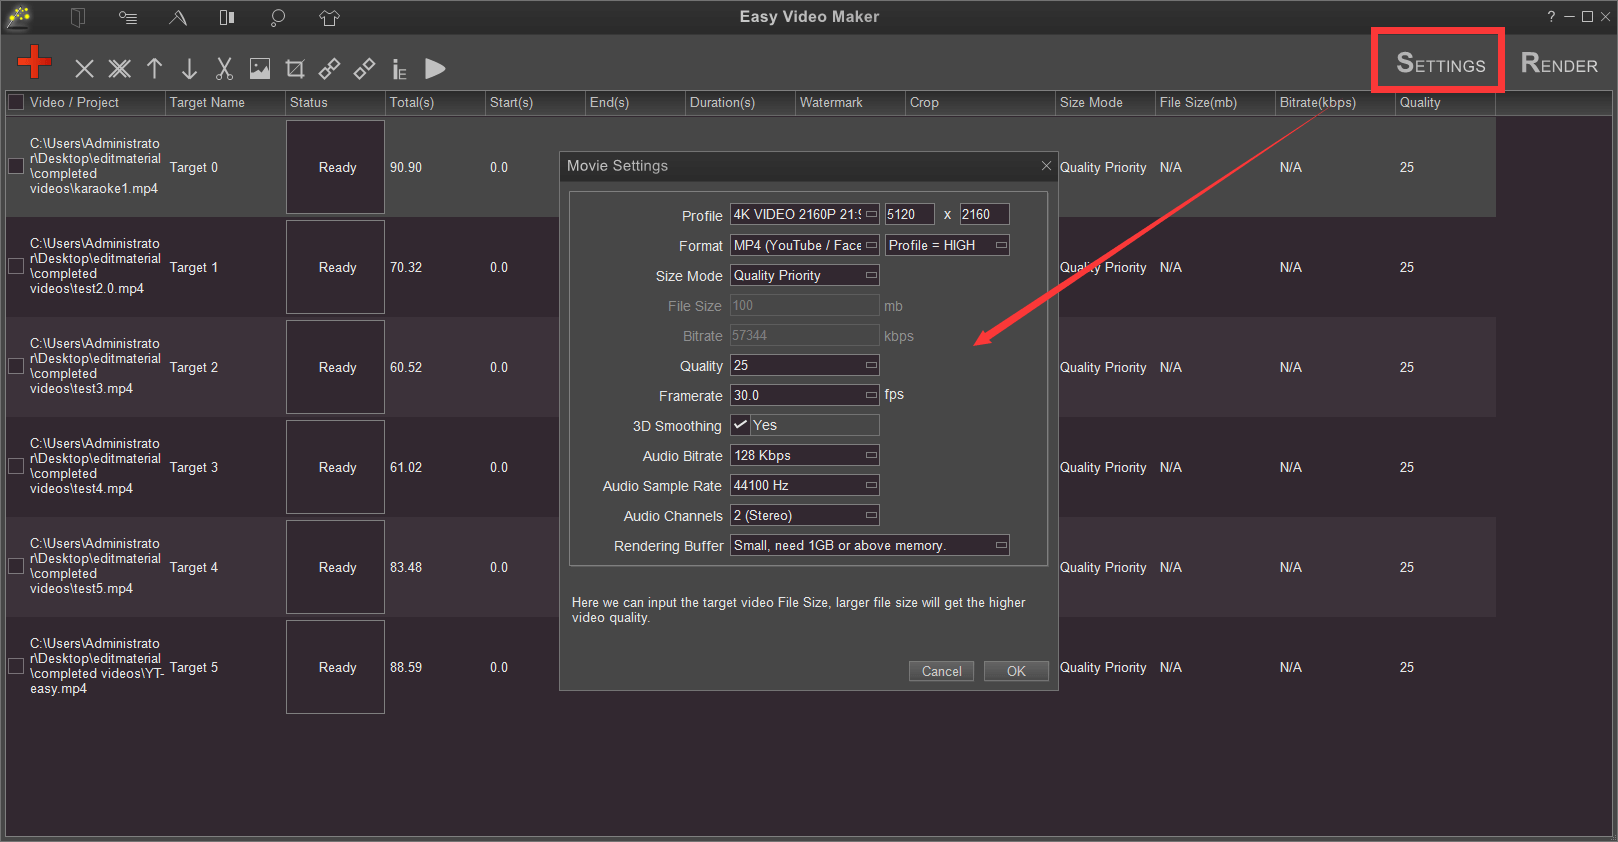
Step 3: You can easily change the target file name, start time, end time, duration, size mode and quality of the videos in the table.
And then you need to click the upper right “Settings ” button to set target parameters of the output videos, you’ll see a pop-out window like this.
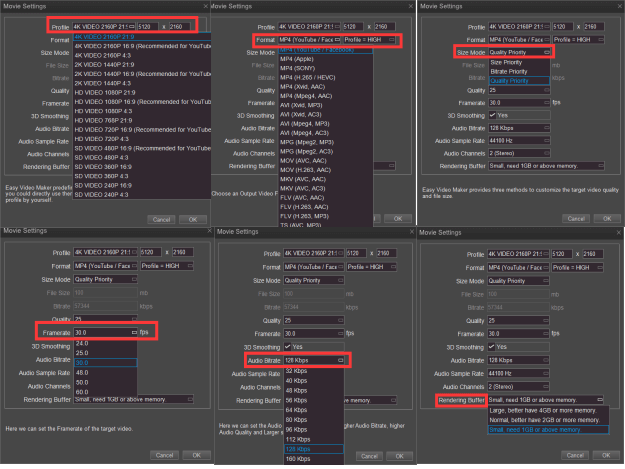
You can choose appropriate Video Resolution, Format, Quality, Frame Rate, Audio Bit rate, Audio Sample Rate, Audio Channels for all videos one time.
Please notice that when you set “Size Mode = Quality Priority”, you could adjust the value of Quality to control the video quality and video file size, such as lowering the value of Quality parameter, improving the video quality, but increasing video file size.
There is a tool bar at the upper of the UI screen.
 This button is used to remove a single selected file.
 This button is used to remove all files.
 These two buttons are used to adjust the file order.
 This button is used to split the selected videos into parts.
 This button is used to add watermark/logo onto all selected videos.
 This button is used to crop the selected video.
 These two buttons are used to put the selected videos together or split the selected combined video.
 This button is used to preview the selected video.
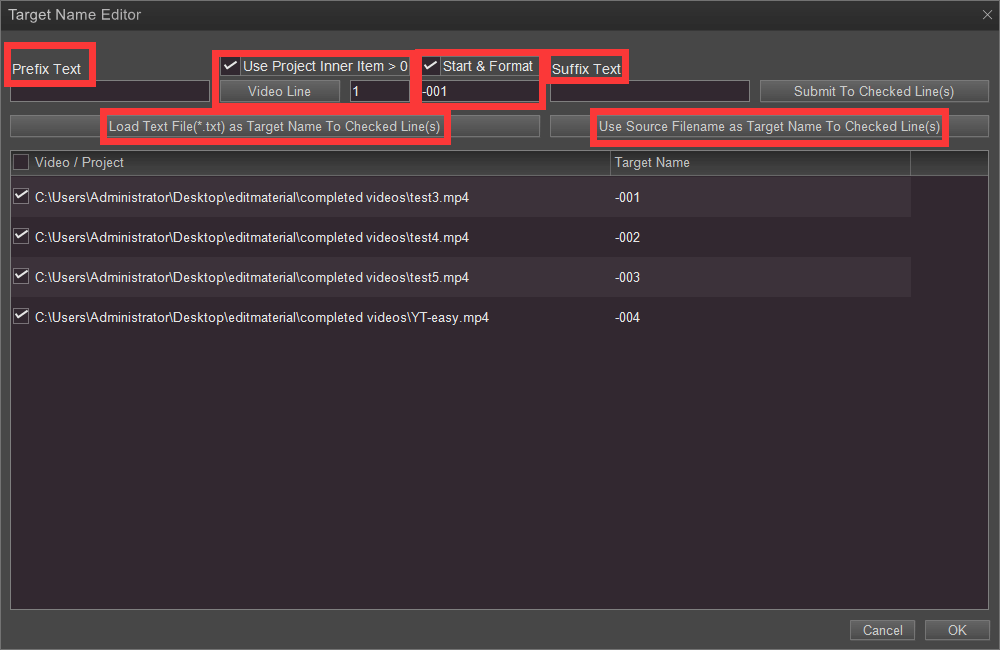
 Click this button and you’ll see a pop-out window as below. You can simply click “Use Source Filename as Target Name to Checked Line(s)” to quickly set all target filename to be same with the source filename. Or you can type in prefix and suffix to auto create a series of videos’ filename, etc.
Step 4: After you setting all parameters, you can click the upper right “Render ” button to handle video files and project files one time.
Hope this function can help you save time when you have many videos or project files to cope with. We also made a tutorial video about this feature.
But attention please, we displayed this feature in the tutorial video using another software especially for making YouTube Videos.
Today, we wanna share you a practical operation.
It is a useful tool to save your time when you need to convert lots of videos between different formats, or render a bulk of project files one time.
I’ll show you how to use it.
Step 1: Run the Easy Video Maker and click the “Function Modules ”
 in the upper left corner of the top line. And choose the “Render Multiple Projects or Videos”.
Then, you’ll see a UI screen as below. Next, click the “big and red plus ”
 button to add all source videos or project files.
Step 3: You can easily change the target file name, start time, end time, duration, size mode and quality of the videos in the table.

And then you need to click the upper right “Settings ”
 button to set target parameters of the output videos, you’ll see a pop-out window like this.

You can choose appropriate Video Resolution, Format, Quality, Frame Rate, Audio Bit rate, Audio Sample Rate, Audio Channels for all videos one time.

Please notice that when you set “Size Mode = Quality Priority”, you could adjust the value of Quality to control the video quality and video file size, such as lowering the value of Quality parameter, improving the video quality, but increasing video file size.
There is a tool bar at the upper of the UI screen.

 This button is used to remove a single selected file.
 This button is used to remove all files.
 These two buttons are used to adjust the file order.
 This button is used to split the selected videos into parts.
 This button is used to add watermark/logo onto all selected videos.
 This button is used to crop the selected video.
 These two buttons are used to put the selected videos together or split the selected combined video.
 This button is used to preview the selected video.
 Click this button and you’ll see a pop-out window as below. You can simply click “Use Source Filename as Target Name to Checked Line(s)” to quickly set all target filename to be same with the source filename. Or you can type in prefix and suffix to auto create a series of videos’ filename, etc.
Step 4: After you setting all parameters, you can click the upper right “Render ”
 button to handle video files and project files one time.
Hope this function can help you save time when you have many videos or project files to cope with. We also made a tutorial video about this feature.
But attention please, we displayed this feature in the tutorial video using another software especially for making YouTube Videos.
