In this article, I will help you to solve the problems that how to record audio or video on PC.
Now let’s get started after opening the Easy Video Maker program.
You have to click the ![]() “Record” button to start your screen recording work, and then a pop-up window will appear to customize your recording area.
“Record” button to start your screen recording work, and then a pop-up window will appear to customize your recording area.
Four main powerful features
As a screen capture software, it can
- Record the entire screen, a single window, or any selected portion
You can directly check the ![]() “Full Screen” box or check the
“Full Screen” box or check the ![]() “Manual Fetching Area” button and drag the mouse to select the recording area casually.
“Manual Fetching Area” button and drag the mouse to select the recording area casually.
Or you can adjust the size of the region by typing the exact value of the width and height ![]() , in this way you will be able to make precise adjustments to your region size.
, in this way you will be able to make precise adjustments to your region size.
- Record audio from your microphone or computer
Click the ![]() “Audio” button to choose the audio recording source, from a computer or Realtek digital device. This feature is ideal for use in recording conferences, meetings, gaming, online teaching, webinars, etc..
“Audio” button to choose the audio recording source, from a computer or Realtek digital device. This feature is ideal for use in recording conferences, meetings, gaming, online teaching, webinars, etc..
- Adjust the audio quality
Click this button ![]() to choose a proper audio quality.
to choose a proper audio quality.
- Record video alone or video and audio simultaneously
If you click the ![]() “Video” button to choose the “Disable”, then there is only audio will be recorded. Whereas, if you click the “Audio” button to disable its function, the video will be recorded alone. But if no “Disable” option was selected, the video and audio will be recorded simultaneously.
“Video” button to choose the “Disable”, then there is only audio will be recorded. Whereas, if you click the “Audio” button to disable its function, the video will be recorded alone. But if no “Disable” option was selected, the video and audio will be recorded simultaneously.
- Adjust the video format, quality, and frame rate for capture
Choose the proper value of video quality from 1 to 43 by clicking the button ![]() “Video Quality”.
“Video Quality”.
Though there are only 3 video formats “MP4, WAV, MKV”, you can find more formats in Settings on the editing UI screen.
Add also, you can choose to record the mouse or not by checking or unchecking the ![]() “Capture Mouse Cursor” button.
“Capture Mouse Cursor” button.
when everything is ready you can click the  “Record” button to start capturing or press f9 on your keyboard to begin recording
if you want to stop the recording just click the  “Stop” button or press the f10 key to end the capturing progress.
If you want to pause your recording, you can press the f9 key again.
Finally, the recording will be saved to a specific location that you set before starting to record.
And it will also be opened in the editing interface which in your convenience to modify its color, playback speed, shape and so on.
Six Additional Features
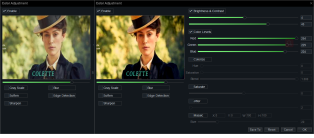
- Adjust the color
Beautify the recording by adjusting its color.

Look at the comparison.

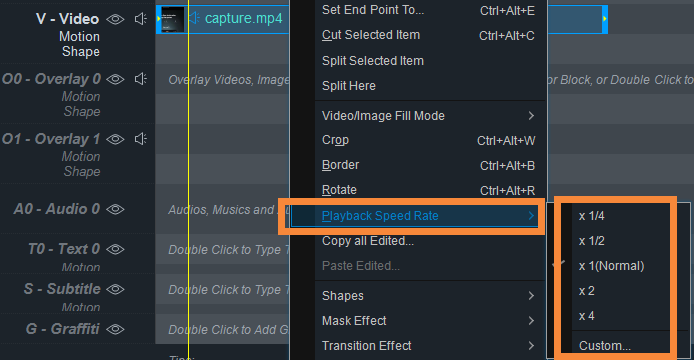
- Adjust the Play Speed
Speed up the parts that you want to skip and slow down the parts you want to emphasize.

- Add Captions/Texts to your Captured Videos
Name it with a title, add some quotes, or input subtitles to explain what the video is or what’s it for.

- Shape the video
Make some changes to the video shape so that it can be more interesting and eye-catchy.

- Add stunning special effects
Add various special effects to modify the recorded video, such as mask effects, transition effects, motion effects, particle effects, audio shake effects, animated effects, etc..
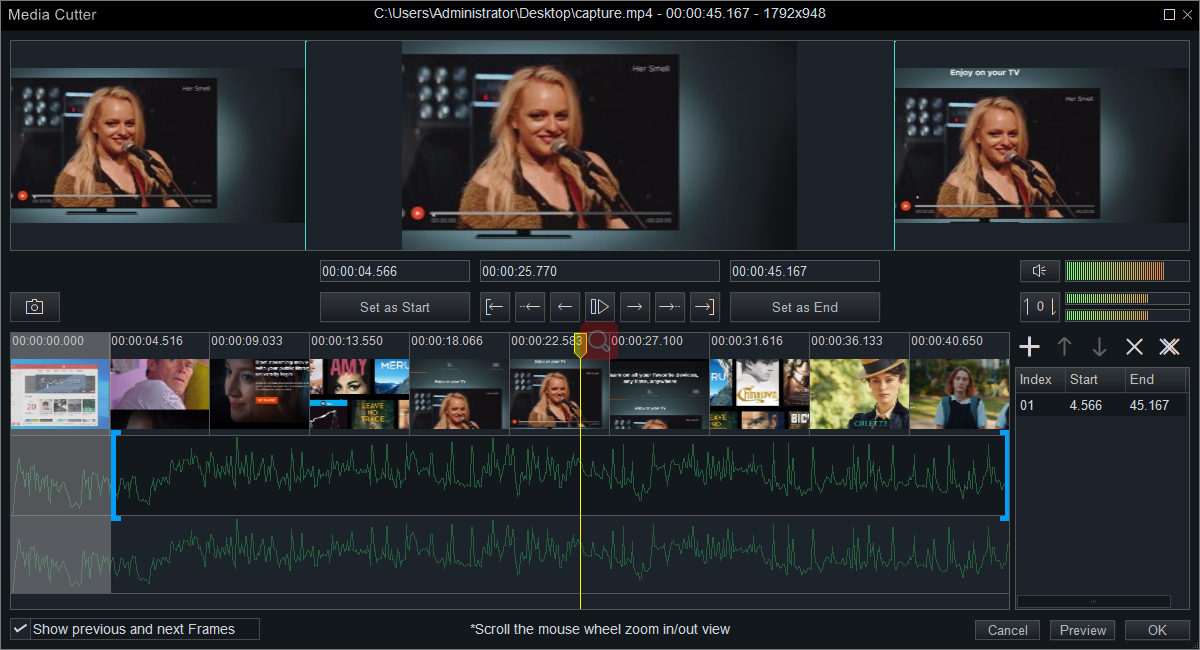
- Cut out useless clips
This could help you cut out the useless parts or the mistakes you made when using the webcam to record.

Whether you are seeking your favorite anime/series/documentaries/movies to watch or to record the highlight parts as materials to recreate a micro movie through another view, those sites can satisfy your basic needs.
![How to make a good tutorial video? [video making tips series] How to make a good tutorial video? [video making tips series]](https://www.easymakevideo.com/knowledge/wp-content/uploads/2023/06/how-to-make-a-good-tutorial-video.png)

![How to make a good travel video? [video making tips series] How to make a good travel video? [video making tips series]](https://www.easymakevideo.com/knowledge/wp-content/uploads/2023/06/how-to-make-a-good-travel-video.png)